PEAP & MSCHAPv2 — Machine and User AAA
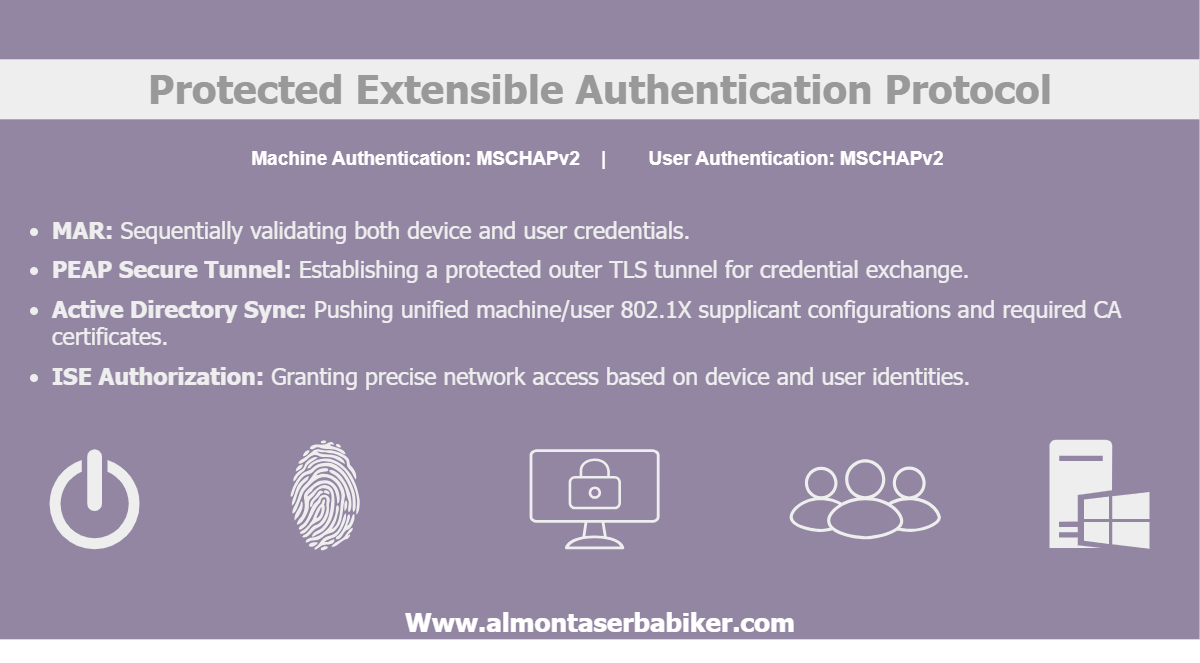
Network access does not depend solely on whether a user is sitting behind a keyboard. A domain-joined endpoint may need network connectivity to locate domain controllers, apply Group Policy, and perform other machine-level operations before a user even enters their credentials. Once the user logs in, the same endpoint may need to transition into a different access profile based on the identity of the person using it. This is where 802.1X, PEAP-MSCHAPv2, Cisco ISE, and Active Directory come together.
Using Cisco ISE as the RADIUS server and Active Directory as the identity source, you will explore how authentication results are evaluated against authorization policies and translated into actual network access. Depending on the authenticated identity, Cisco ISE will dynamically assign the endpoint to a specific VLAN and apply a downloadable Access List (dACL), demonstrating how identity-based access control can change as the authentication phase changes.
By the end of this article, a complete setup will be built to authenticate a Windows 11 domain-joined endpoint using PEAP-MSCHAPv2 Machine Authentication, transition to PEAP-MSCHAPv2 User Authentication after interactive login, and dynamically enforce identity-based network access through Cisco ISE using VLAN assignment and downloadable ACLs.
Protocols… always!
Before jumping into the configuration, protocols should be treated as different components of the same authentication process. Each one has a specific work to do, and understanding how they fit together will make the configuration much easier to follow.
802.1X: is the access control framework that requires an endpoint to authenticate before gaining network access.
It defines three roles:
- Supplicant: The endpoint requesting network access, such as a Windows, Android, or iOS device.
- Authenticator: The network device controlling access, can be a netowork Switch , Wireless Lan Controller or any other networking device that supports 802.1x.
- Authentication Server: The server responsible for validating the endpoint’s credentials, such as Cisco ISE.
802.1X uses EAP to carry authentication messages between the supplicant and the authentication server through the authenticator. The endpoint requests access, the NAD controls the entrance, and ISE decides whether the authentication is valid.
But how do these devices actually communicate?
The endpoint and switch exchange EAP messages using EAP over LAN (EAPoL). The switch then forwards the authentication conversation to ISE using RADIUS. 802.1X defines the access control framework, while EAP provides the authentication message format and RADIUS carries the authentication exchange between the switch and ISE.
PEAP — The Protected Tunnel
Protected Extensible Authentication Protocol (PEAP) is an EAP authentication method that establishes a TLS-protected tunnel between the supplicant and the authentication server.
Why do we need this tunnel? (AKA: Outer Method)
Our scenario uses PEAP-MSCHAPv2, where the endpoint authenticates using Active Directory credentials. Those credentials must be exchanged inside a protected channel rather than being exposed directly on the network. PEAP provides that protection by establishing a TLS tunnel before the inner authentication method takes place. The important distinction is that PEAP provides the protected tunnel, while MSCHAPv2 performs the inner username/password authentication.
The same PEAP-MSCHAPv2 method will be used for both phases of our scenario:
- Machine Authentication — The endpoint authenticates using its domain computer credentials.
- User Authentication — The endpoint authenticates using the credentials of the logged-in domain user.
RADIUS
Remote Authentication Dial-In User Service (RADIUS) is the protocol that carries authentication, authorization, and accounting information between the network device and the authentication server.
In this setup:
- The Cisco vSwitch is the RADIUS client.
- Cisco ISE is the RADIUS server.
The switch communicates with ISE using RADIUS over IP. ISE evaluates the authentication request and returns the result, along with additional authorization attributes when applicable. For example, ISE may return:
- Access-Accept or Access-Reject.
- VLAN assignment.
- Downloadable ACL (dACL).
- Other authorization attributes supported by the network device.
Putting It All Together:
- 802.1X: Defines and Controls secure access to the network.
- EAP: Carries the authentication conversation.
- PEAP: Protects the inner authentication exchange.(Outer method)
- MSCHAPv2: Authenticates the machine or user credentials (Inner method).
- RADIUS: Carries the authentication request and result between the switch and ISE.
- ISE: Evaluates the request and decides what access should be granted.
- Active Directory: Validates the domain identity. (Single Source of Truth)
Once these pieces work together, you can move beyond simply authenticating an endpoint.
Topology Diagram
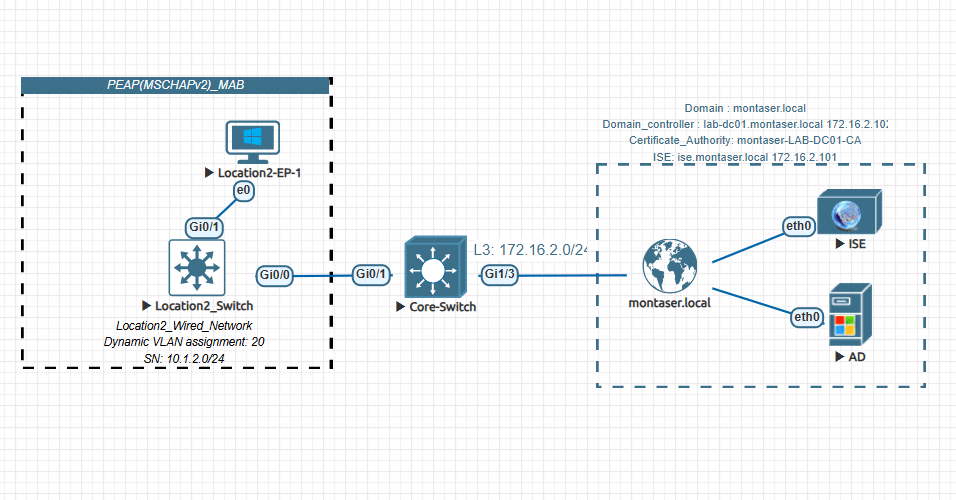
Before walking through the authentication flow, let’s establish the lab environment. The topology is intentionally simple: a single endpoint connecting through a Layer 2 access switch, which uplinks to a core switch and then to the identity and directory services.
Key Roles
Location2-EP-1: (supplicant) As shown in the diagram, Location2-EP-1 plays the supplicant role. The endpoint is joined to the
montaser.localActive Directory domain, and its supplicant configuration—including the PEAP/MSCHAPv2 settings, trusted CA, and authentication mode—is pushed automatically through a Group Policy Object (GPO).Location2_Switch: (Authenticator) The access port
Gi0/1connects to the endpoint, while the uplinkGi0/0connects to Core-Switch. The switch runs an authentication order of dot1x mab, meaning dot1x is attempted first. It forwards RADIUS requests to ISE and applies the authorization result, including any VLAN assignment returned by ISE.Core-Switch: (Transit) The Core-Switch provides the Layer 3 path between the access switch and ISE. It simply routes the RADIUS traffic between them; no authentication or authorization decisions are made here.
ISE: (RADIUS / Policy) ISE acts as the RADIUS server and policy engine. It identifies the endpoint, and returns the initial authorization result. Later, when the endpoint authenticates using PEAP, ISE handles the authentication process, validates the MSCHAPv2 credentials against Active Directory, and returns the appropriate authorization result.
This article assumes that Cisco ISE is already joined to the
montaser.localActive Directory domain.
- AD: (Identity Store) Active Directory stores the user accounts used to authenticate inside the PEAP tunnel. It also hosts the internal Certificate Authority (CA), which issued the EAP certificate used by ISE.
Configure the Supplicant (Location2-EP-1)
Basically, Location2-EP-1 is a Windows 11 workstation joined to the montaser.local Active Directory domain.
For convenience, you can push the supplicant service and network profile configuration from the domain controller using a Group Policy Object (GPO). This keeps the lab close to how things are handled in real deployments, where you might have tens or hundreds of workstations to configure.
Instead of manually configuring every endpoint, you can let the domain handle it.
First, let’s verify that the workstation is properly joined to the Active Directory domain. Navigate to Control Panel > System and Security > System
Note: You may need to change the default system-generated hostname and join the PC to your existing Active Directory domain
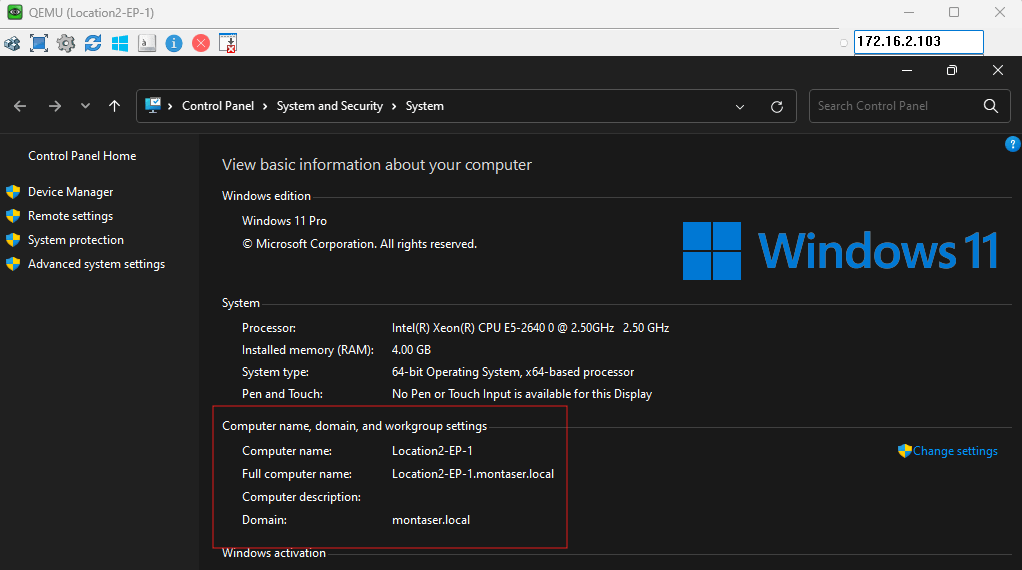
Computer name , Domain, and workgroup settings section confirms that Location2-EP-1 has joined montaser.local domain, at this point you can jump directly to the domain controller to create configuration GPOs.
Configuring Active Directory Users, Computers and GPOs
The main purpose of this section is to automatically enable 802.1X and configure the supplicant on domain-joined endpoints, including configuring the endpoint to trust the root CA that issued the ISE server certificate used to establish the PEAP TLS tunnel.
Perform the following steps on your existing domain controller:
1- Run dsa.msc to open Active Directory Users and Computers.
2- Create a new Organizational Unit (Optional) name it Location_2_Wired_Workstations.
3- Add Location2-EP-1 to the newly created Organizational Unit.
4- Create A new security group and add the workstation to that group.
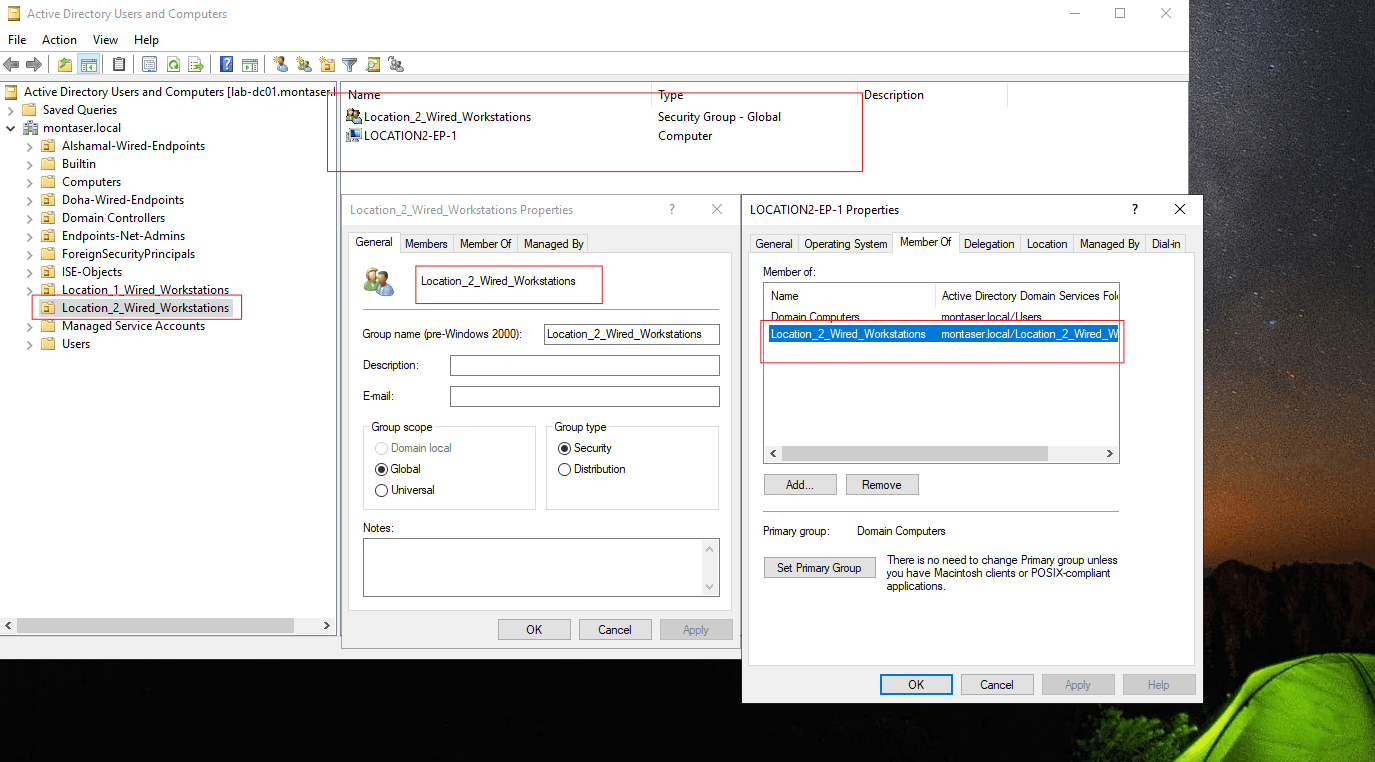
5- Run gpmc.msc to open Group Policy Management console. 6- Under Location_2_Wired_Workstations OU create a new policy object and name it WiredAuto-Config-PEAP-GPO
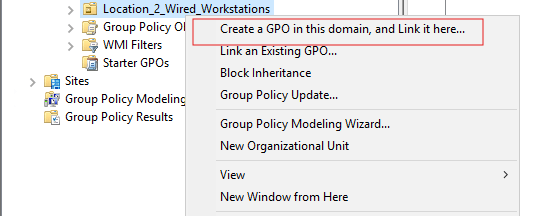
7- Right-click on WiredAuto-Config-PEAP-GPO and select Edit to start editing the GPO.
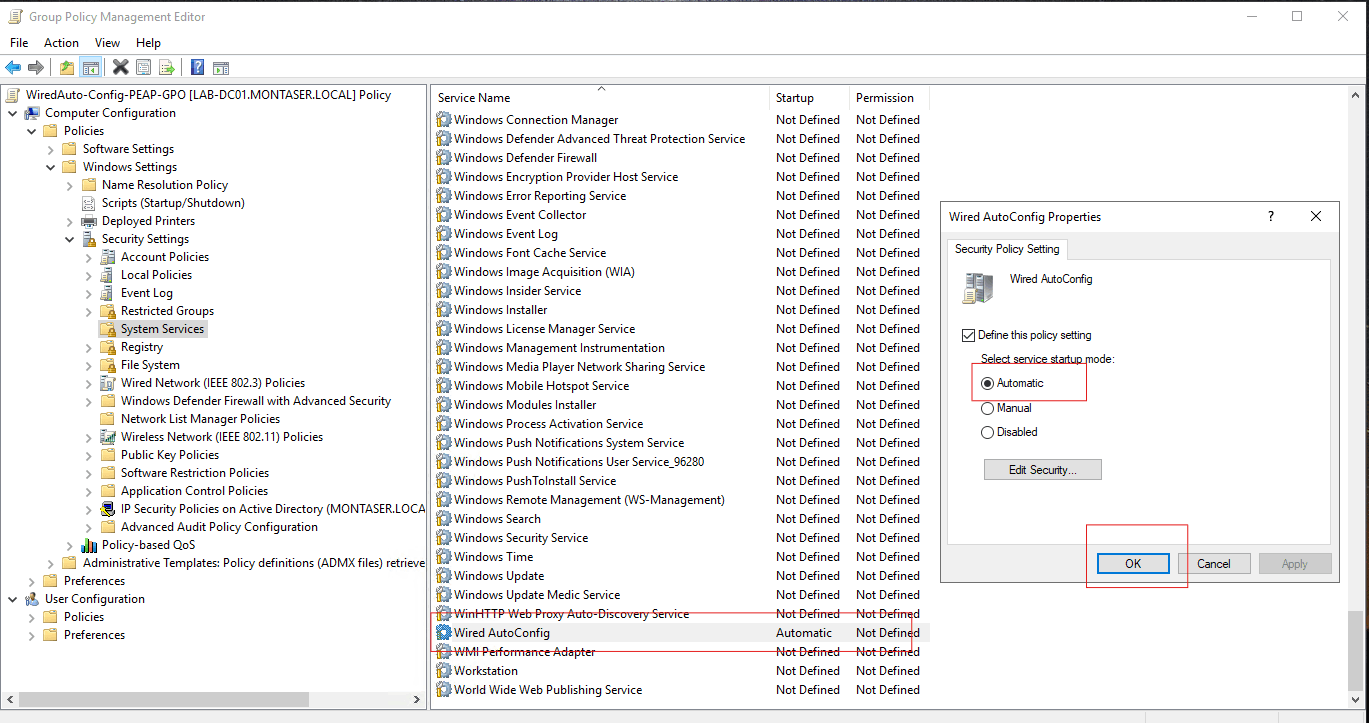
8- Under Computer Configuration > Windows Settings > Security Settings > System Services locate the Wired AutoConfig service and set it to Automatic
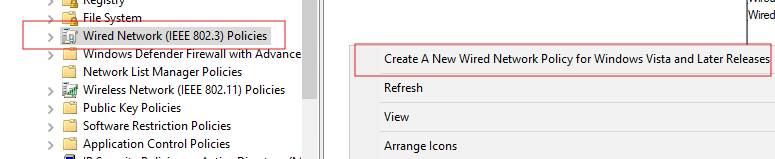
9- Computer Configuration > Windows Settings > Security Settings > Wired Network (IEEE 802.3) policies right-click and Create new … name it Wired-Endpoints-802.1x-Policy
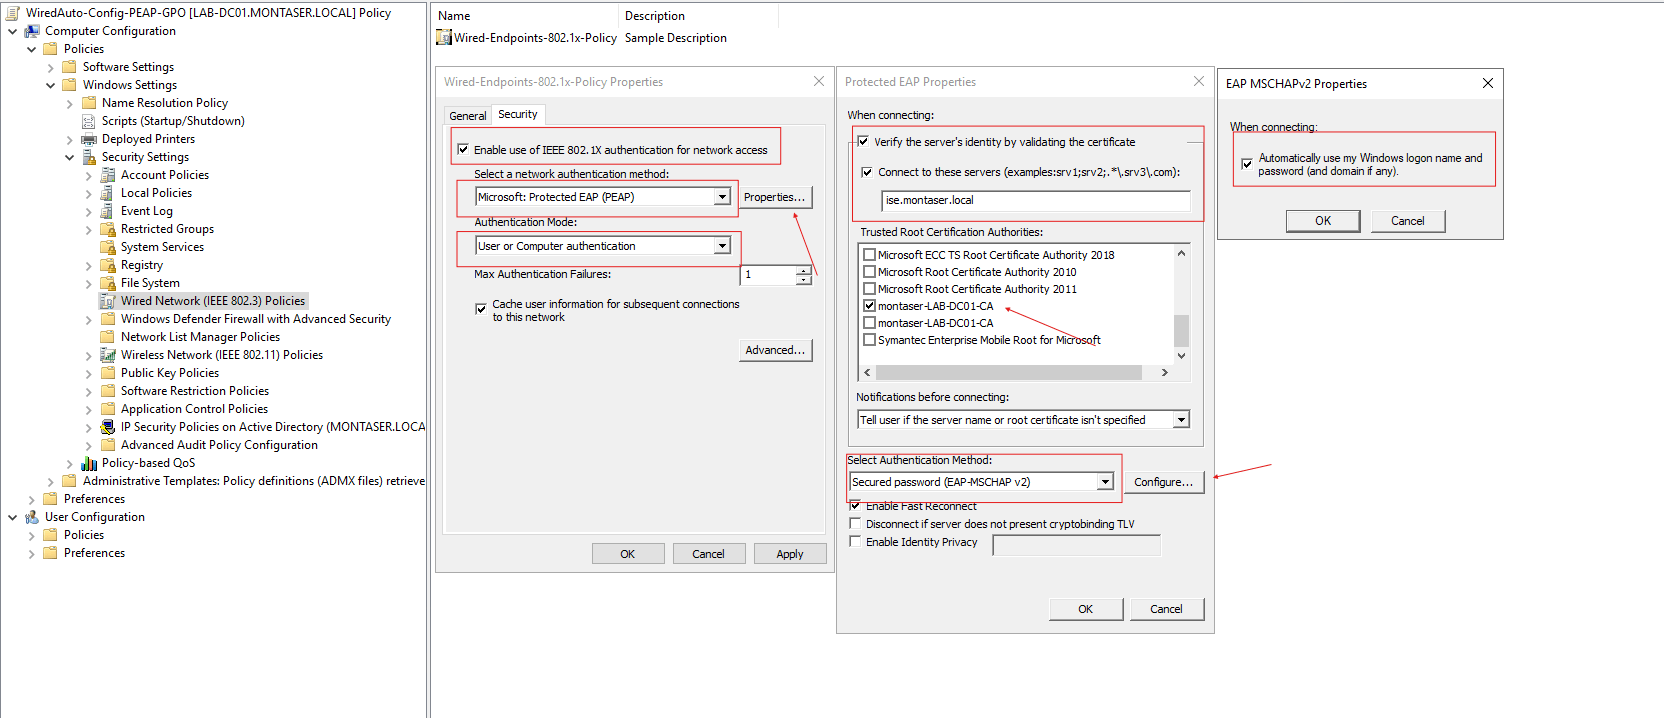
10- Configure the native supplicant Policy as follows:
Note: Adjust the trusted authentication server name and CA settings according to your environment. For a lab or testing environment, you may choose to disable server certificate validation; however, this causes the supplicant to accept the RADIUS server’s certificate without verifying its trust chain and identity.
- Enable use of IEEE 802.1X authentication for network access:
Enabled - Select a network authentication method: Microsoft:
Protected EAP (PEAP) - Connect to these servers:
ise.montaser.local - Trusted Root Certification Authorities:
montaser-LAB-DC01-CA - Select Authentication Method: Secured password
EAP-MSCHAP v2 - Automatically use my Windows logon name and password (and domain if any):
Enabled
11- Save all and Update the policy in Location2-EP-1 using the following command:
1
gpupdate /force
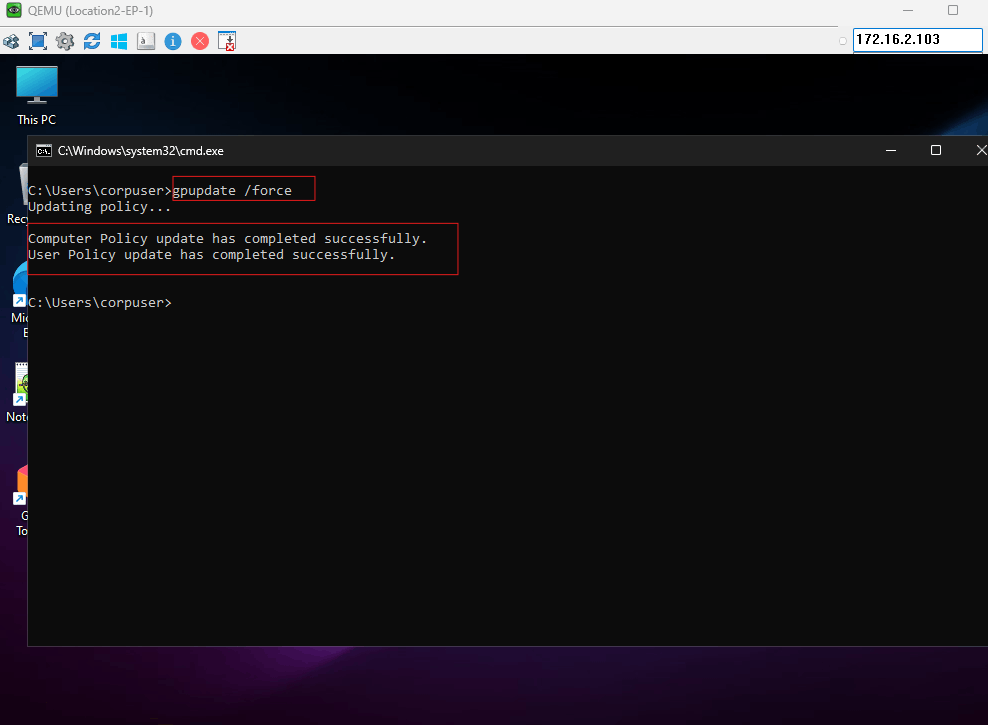
12- Verify Location2-EP-1 802.1x supplicant is enabled and configured according to The GPO defined earlier:
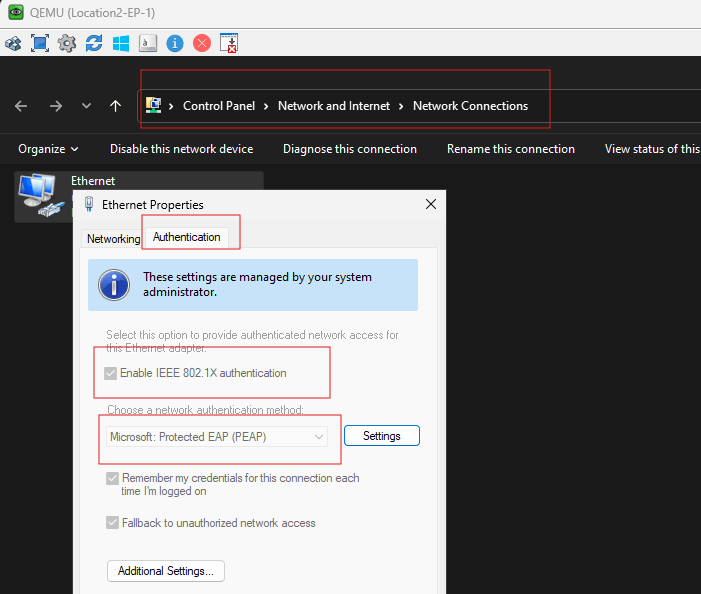
At this point you are ready to start configuring the Network Access Device (Location2_Switch)
Configure the Authenticator (Location2_Switch)
The configuration in this section is intentionally minimal, focusing only on the essential settings required to enable 802.1X authentication
AAA Global Configuration:
1
2
3
4
5
6
7
8
9
10
11
12
13
14
15
16
17
18
19
20
21
22
23
24
25
26
27
28
aaa new-model
aaa local authentication ISE-Auth authorization ISE-Authz


aaa authentication dot1x default group ISE-SG
aaa authorization network default group ISE-SG
aaa accounting dot1x default start-stop group ISE-SG

aaa group server radius ISE-SG
 server name ise.montaser.local
 deadtime 5

radius server ise.montaser.local
 address ipv4 172.16.2.101 auth-port 1812 acct-port 1813
 key *****

aaa server radius dynamic-author
 client 172.16.2.101 server-key *****

dot1x system-auth-control
aaa session-id common

interface Vlan100
 description RADIUS-L3
 ip address 10.1.100.3 255.255.255.0

ip route 172.16.0.0 255.255.0.0 10.1.100.1
Access Interface Configuration:
1
2
3
4
5
6
7
8
9
10
11
12
interface GigabitEthernet0/1
Description ### Location2-EP-1 ###
 switchport mode access
 negotiation auto
 authentication event fail action next-method
 authentication order dot1x mab
 authentication priority dot1x mab
 authentication port-control auto
 authentication periodic
 mab
 dot1x pae authenticator
 spanning-tree portfast edge
Configure The Authentication Server (ISE)
Adding Location2_Switch as a Network Device
Before ISE can process authentication requests from the access switch, the switch must be registered as a Network Device.
Navigate to:
Administration > Network Resources > Network Devices
Click Add and enter the device details.
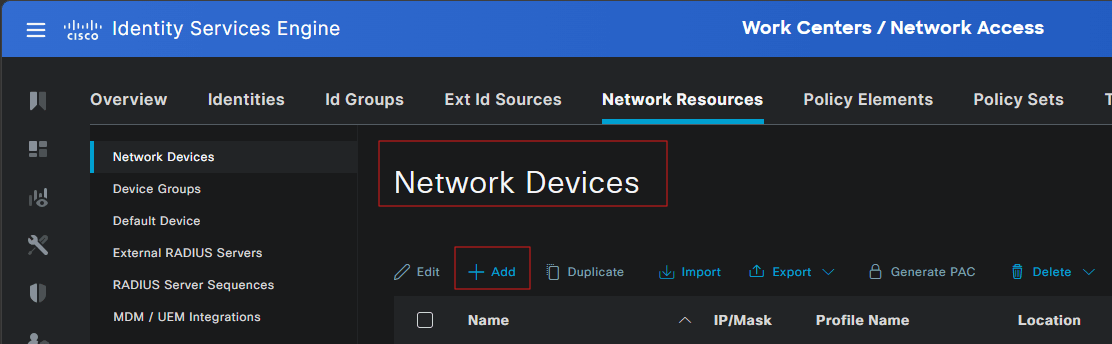
Configure the device parameters:
Configure the following device parameters:
- Name: Location2_Switch
- IP Address: The IP address used by the switch to communicate with ISE.
- Device Type: Select the appropriate network device type for your environment.
- Network Device Group: Assign the device to the relevant group if required.
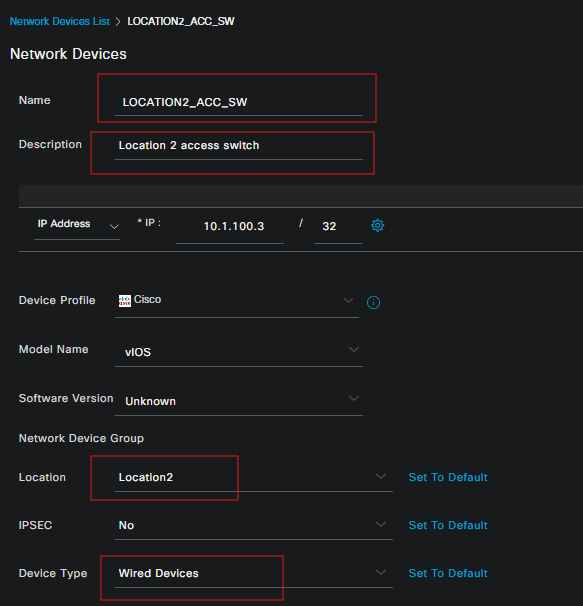
Configure RADIUS parameters:
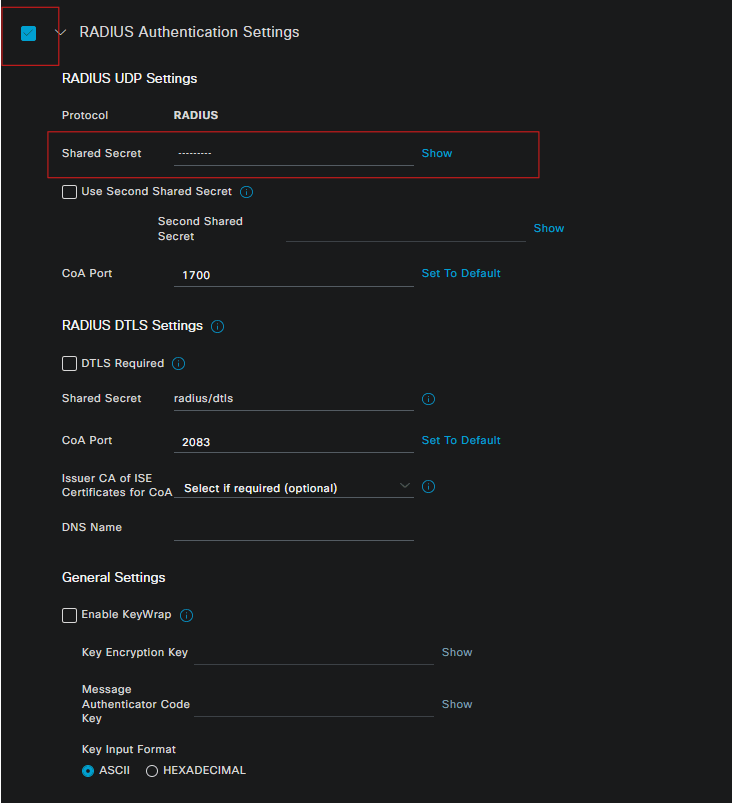
Enable RADIUS authentication and configure the shared secret.
The shared secret must match the key configured on the switch under the RADIUS server definition. In this lab, the switch uses ISE as its RADIUS server for authentication, authorization, and accounting.
Integrate with AD and Enable MAR
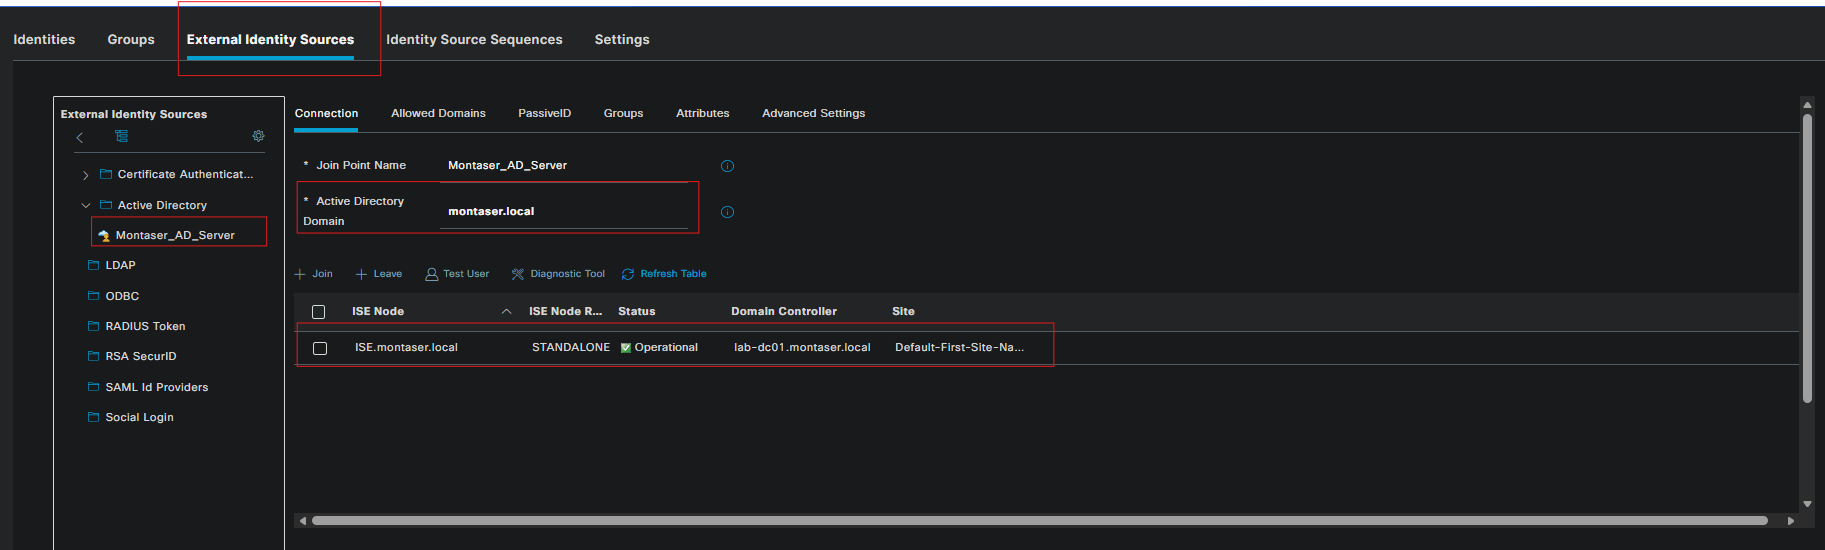
Cisco ISE uses Active Directory as the identity source for validating the credentials submitted by the Windows supplicant. In this lab, ISE is joined to the montaser.local Active Directory domain. This allows ISE to authenticate domain users and computer accounts through the configured AD integration.
Navigate to:Administration > Identity Management > External Identity Sources > Active Directory
Join ISE to the domain:
If ISE is not already joined to the domain, configure the Active Directory join point using the domain name and an account with sufficient permissions to join the ISE node to the domain. After joining the domain, verify that the connection is successful, then retrieve the required AD groups. In this lab, the Network Administrators and Corporate Users groups are imported into ISE.
Enable MAR:
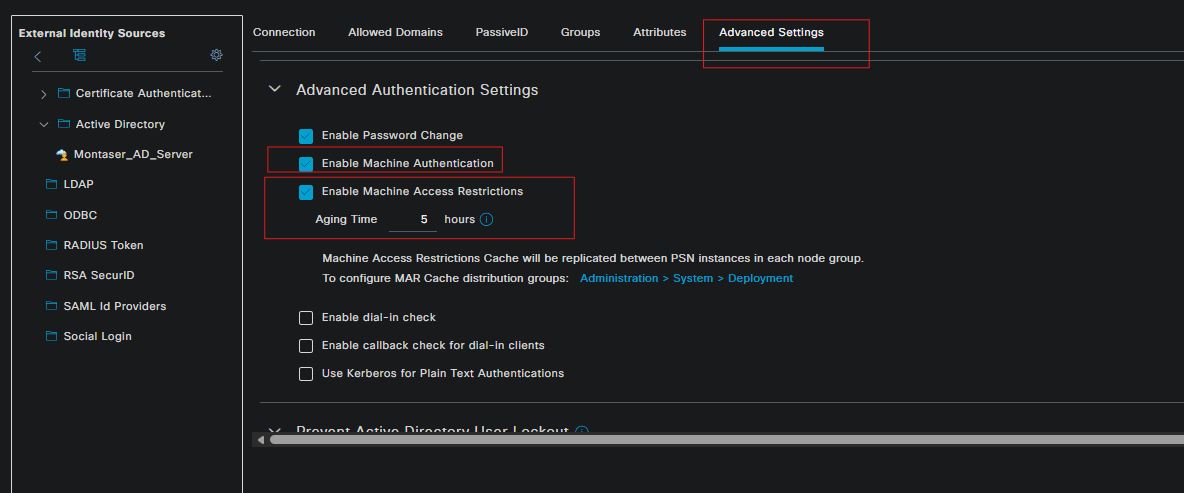
Machine Access Restriction (MAR) is used to support the traditional PEAP machine-before-user authentication workflow.
Enable the machine authentication and MAR options under the Active Directory join-point Advanced configuration.
The purpose of MAR is to allow ISE to determine whether a machine has previously authenticated successfully before authorizing a subsequent user authentication. This is important when the requirement is that a user must not receive normal network access unless the endpoint has already authenticated using its machine account.
The machine authentication and user authentication are separate PEAP authentication sessions. MAR allows ISE to correlate the machine authentication with the later user authentication for authorization purposes.
Note: MAR is a traditional mechanism used to support machine authentication with PEAP. Newer outer methods, such as TEAP, were developed to reduce dependency on MAR. TEAP uses a different authentication model and will be evaluated separately in a dedicated lab.
Create the Policy Set:
The policy set defines how ISE handles authentication requests received from the wired access switch.
Navigate to:
Policy > Policy Sets
Create a new policy set for the Location2 wired authentication scenario.
Policy Set configuration:
- Name:
Location2_Wired - Condition: For example, the policy set can match the network device group containing device type
Wired Devicesand Device locationLocaction2. - Allowed protocols: The built-in
Default Network Accessprotocol list is sufficient for this lab, as it already allows the required PEAP and MSCHAPv2 authentication methods.
The policy set should be placed above the default policy set so that the requests from this lab are processed by the intended authentication and authorization rules.

After creating the policy set, open it to configure the Authentication Policy and Authorization Policy.
Configure Authentication policy:
The Authentication Policy determines how ISE validates the credentials submitted by the endpoint. For this lab, the authentication method is wired 802.1x, and Active Directory is used as the identity source.
Configure the wired 802.1X authentication rule with the following settings:
- Condition: Wired 802.1X authentication
- Allowed Protocols: (ISE Identity Source Sequence that performs lookups against Active Directory)
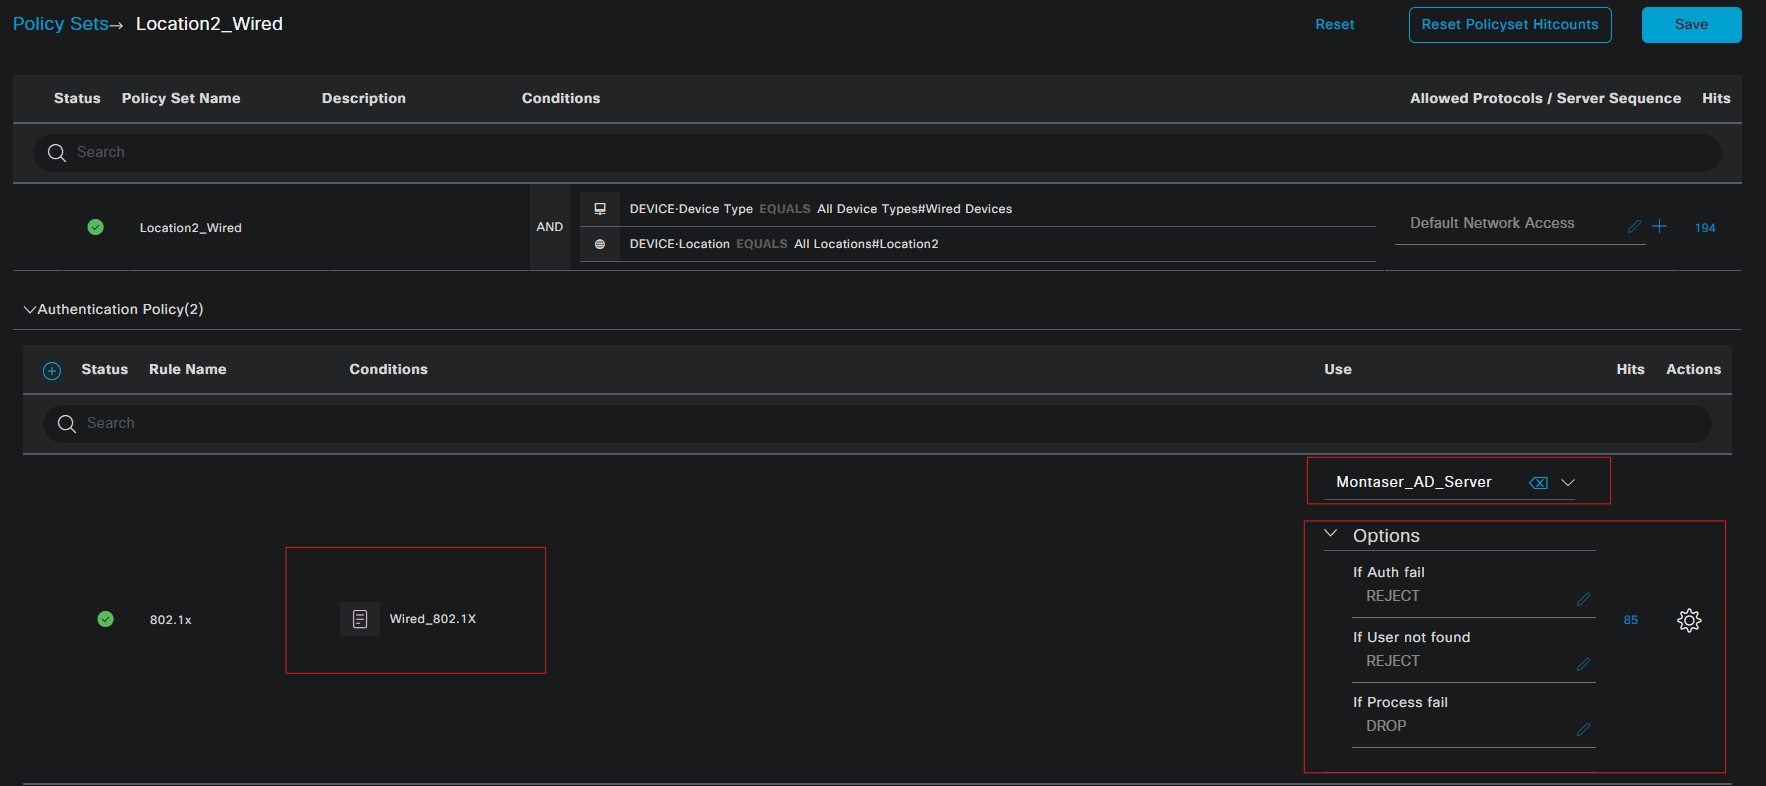
The authentication result is then passed to the Authorization Policy, where ISE determines the appropriate network access level.
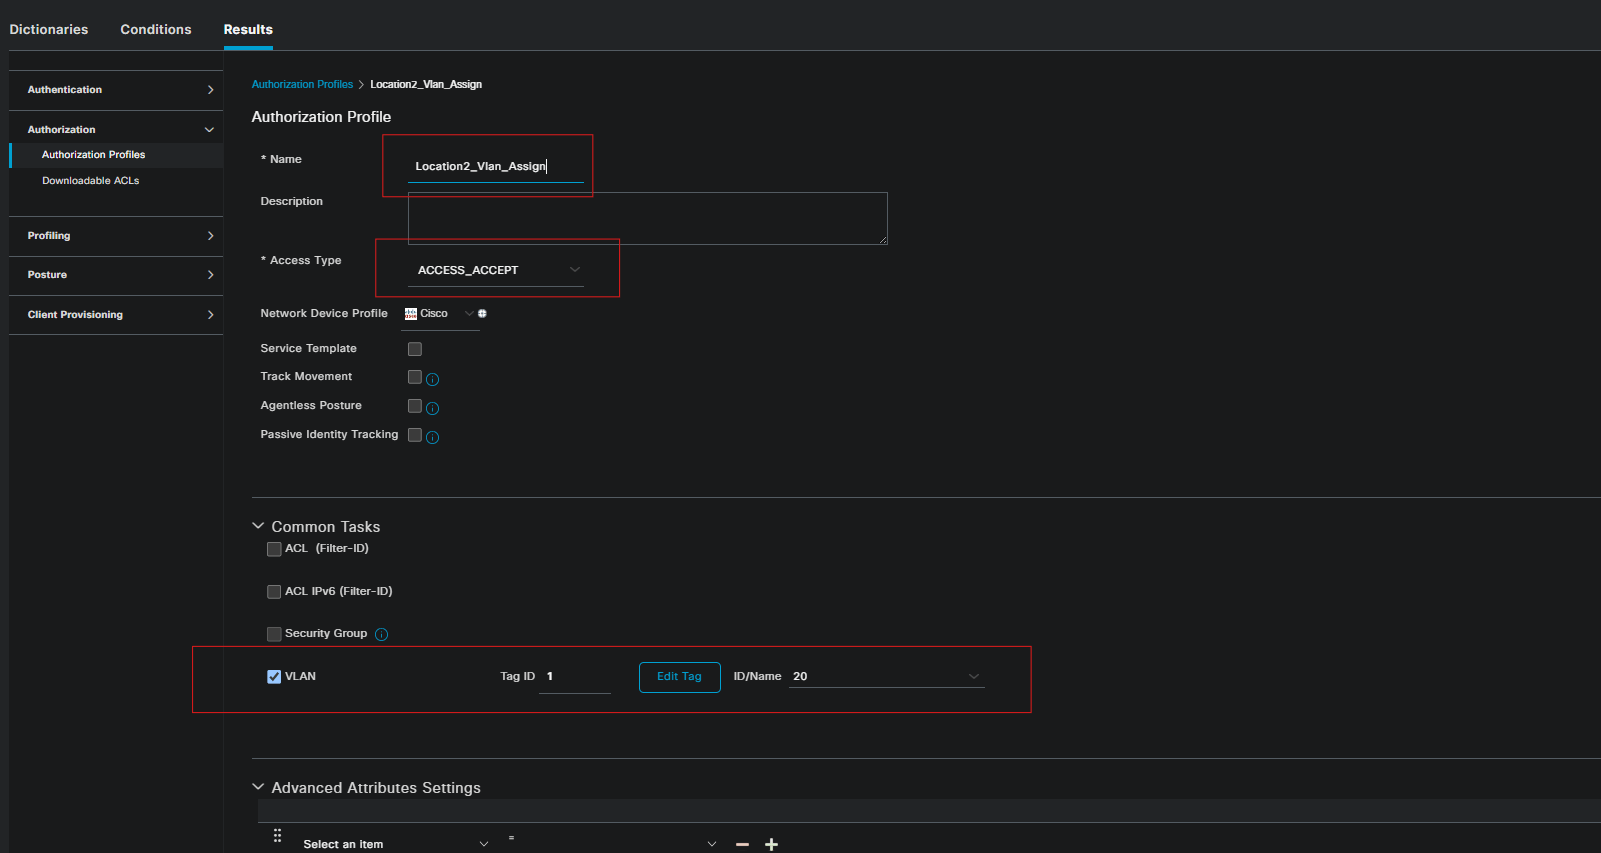
Location2_Vlan_Assign Authorization Profile:
The Location2_Vlan_Assign authorization profile is used to assign the endpoint to the VLAN associated with the successful authentication result.
Navigate to: Policy > Policy Elements > Results > Authorization > Authorization Profiles
Create or select the authorization profile used by the Location2 wired authentication policy and Configure the VLAN assignment attributes required by the switch.
For this lab, the successful PEAP authentication result assigns the endpoint to VLAN 20.
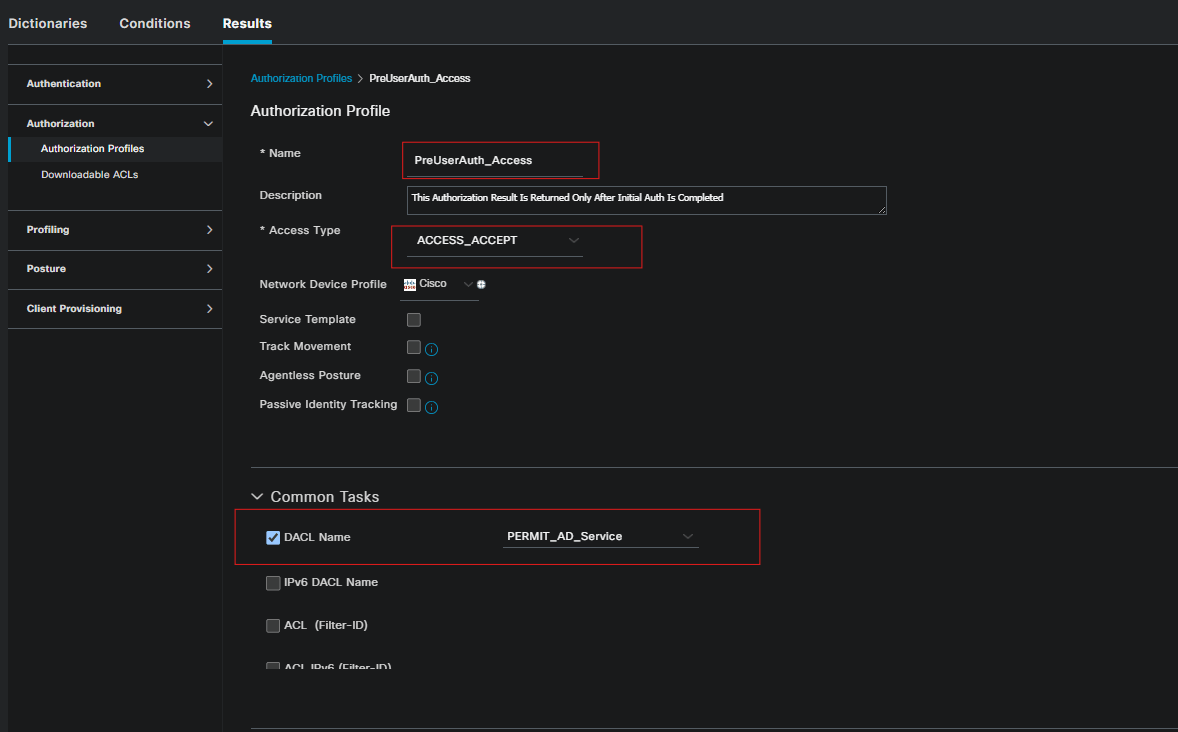
PreUserAuth_Access Authorization Profile:
Permit_AD_service dACL:
First, create a dACL that permits only the traffic required to reach the appropriate infrastructure services, rather than allowing unrestricted network access.
For this lab, the required services may include DNS and DHCP.
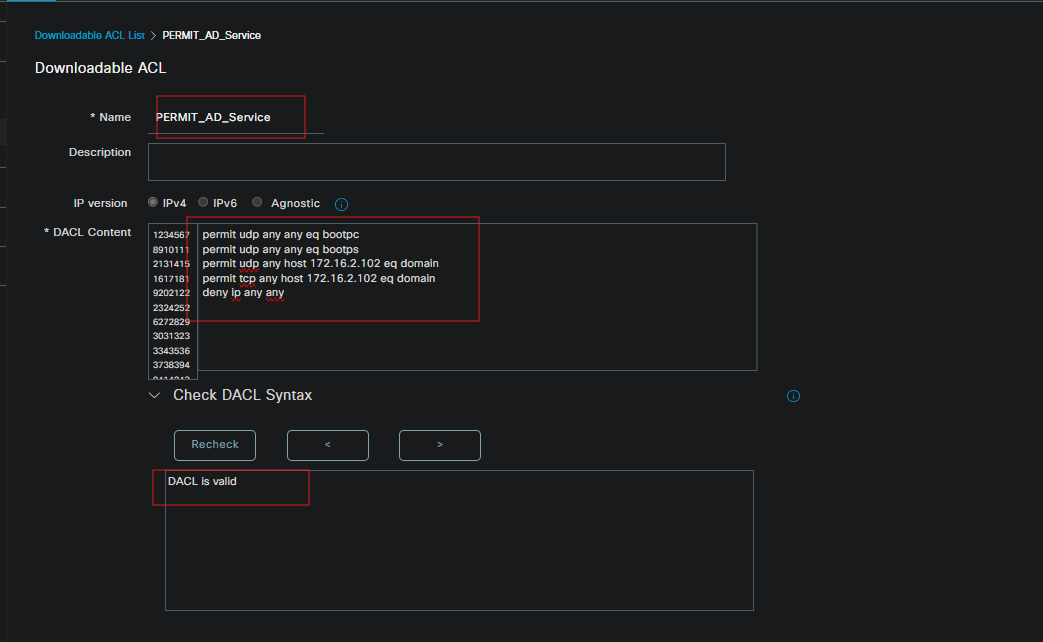
Save it, Then create the PreUserAuth_Access authorization profile for the initial access state before the endpoint completes user authentication. Its purpose is to provide the endpoint with the minimum access required during this stage while preventing it from receiving the same level of access granted to a fully authenticated user. For this lab, the profile returns the Permit_AD_service downloadable ACL (dACL) defined in the previous step.
Permit_Internal_Access Authorization Profile:
After successful user and machine authentication, you can further test authorization by allowing a specific AD user group to access only a specific subnet. In this lab, users who are members of the Corporate Users AD group will be permitted to communicate only with hosts in the 172.16.2.0/24 subnet.
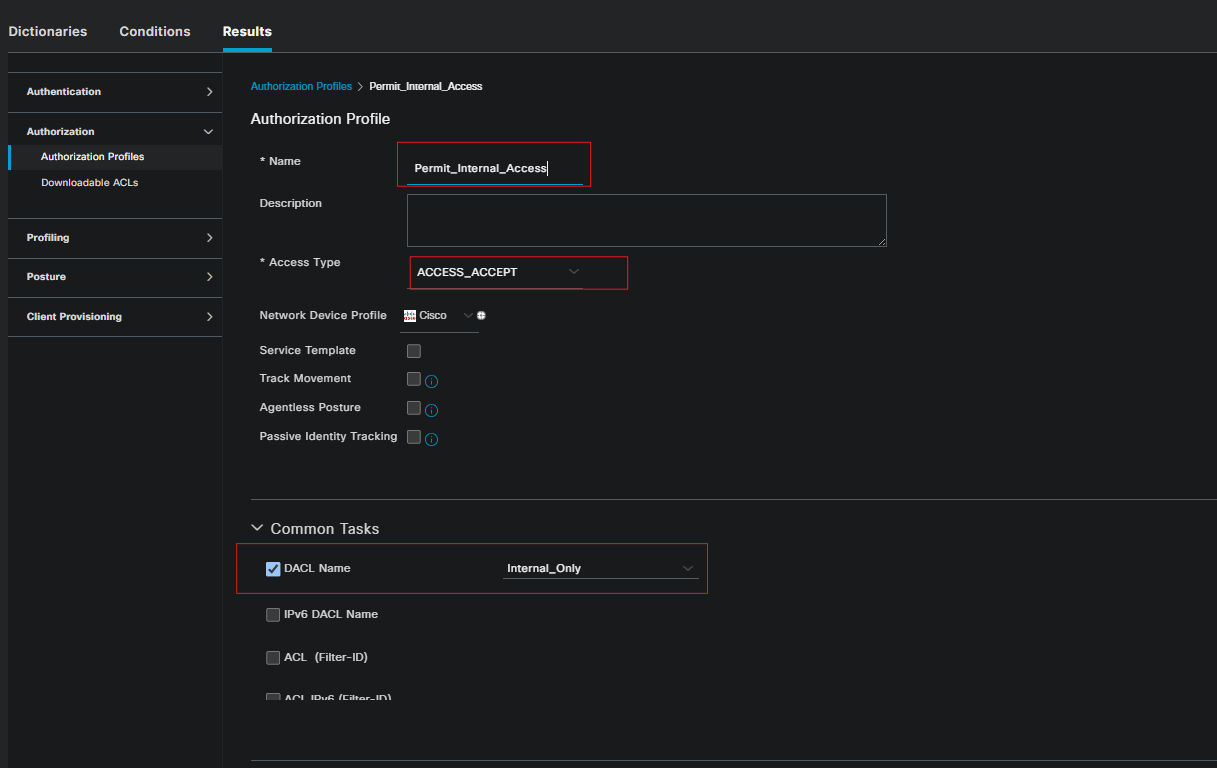
First, create create the Internal Only dACL which restrict the communication to 172.16.2.0/24 network resources.
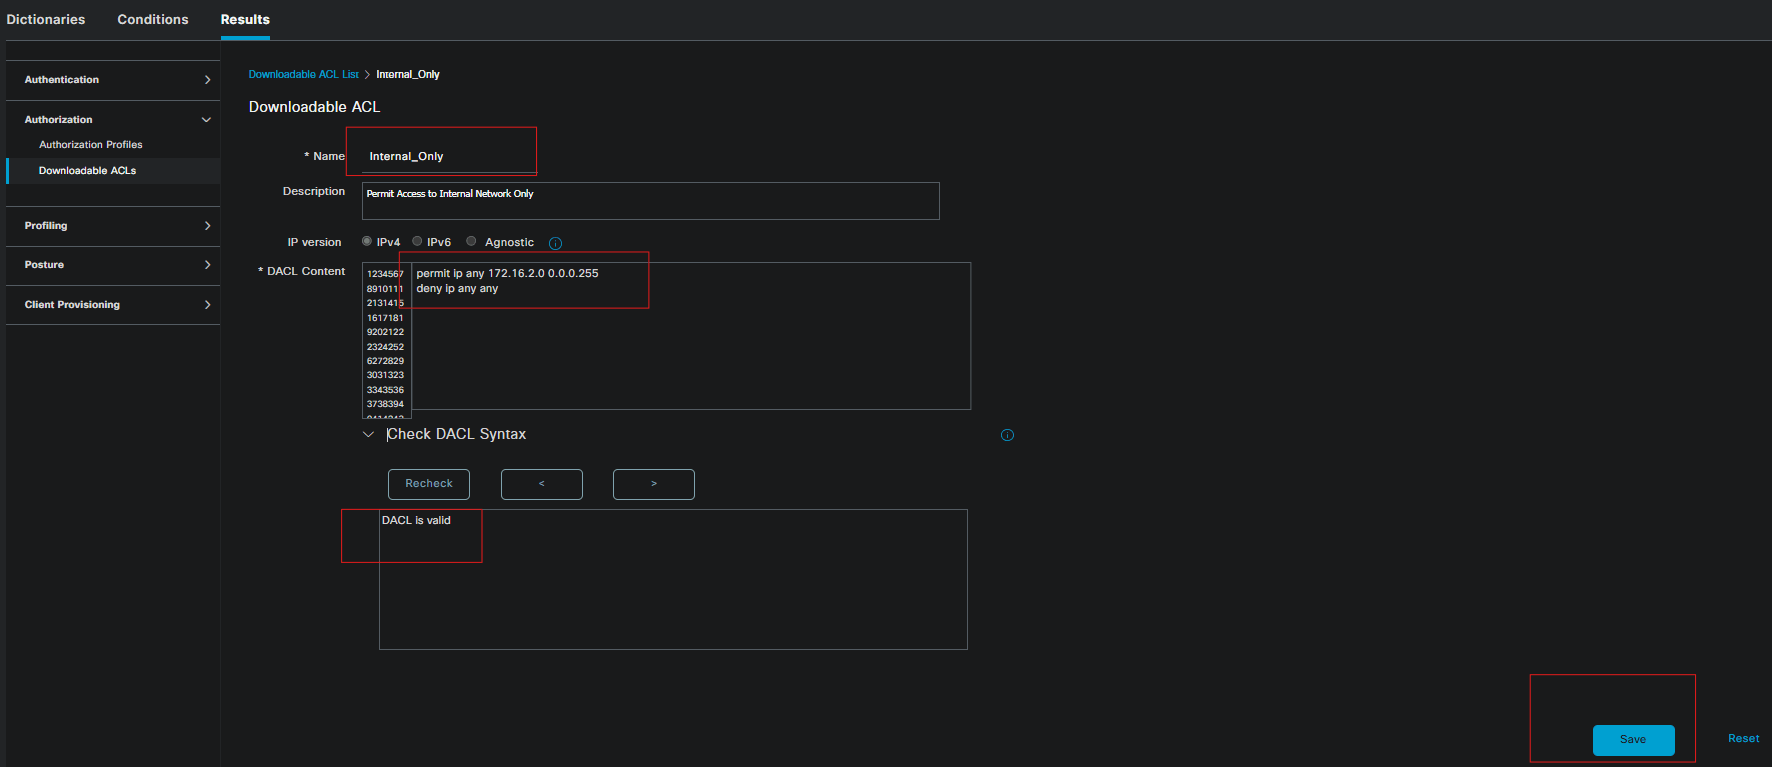
Then, create a new authorization profile and name it Permit_Internal_Access and prconfigure it to return the Internal_Only dACL.
Configure Authorization policy:
The authorization policy processes requests sequentially from top to bottom. It enforces a dual-factor validation logic, verifying the user’s Active Directory group membership while strictly checking that the underlying machine successfully passed its own computer-phase authentication using the Network Access:WasMachineAuthenticated attribute.
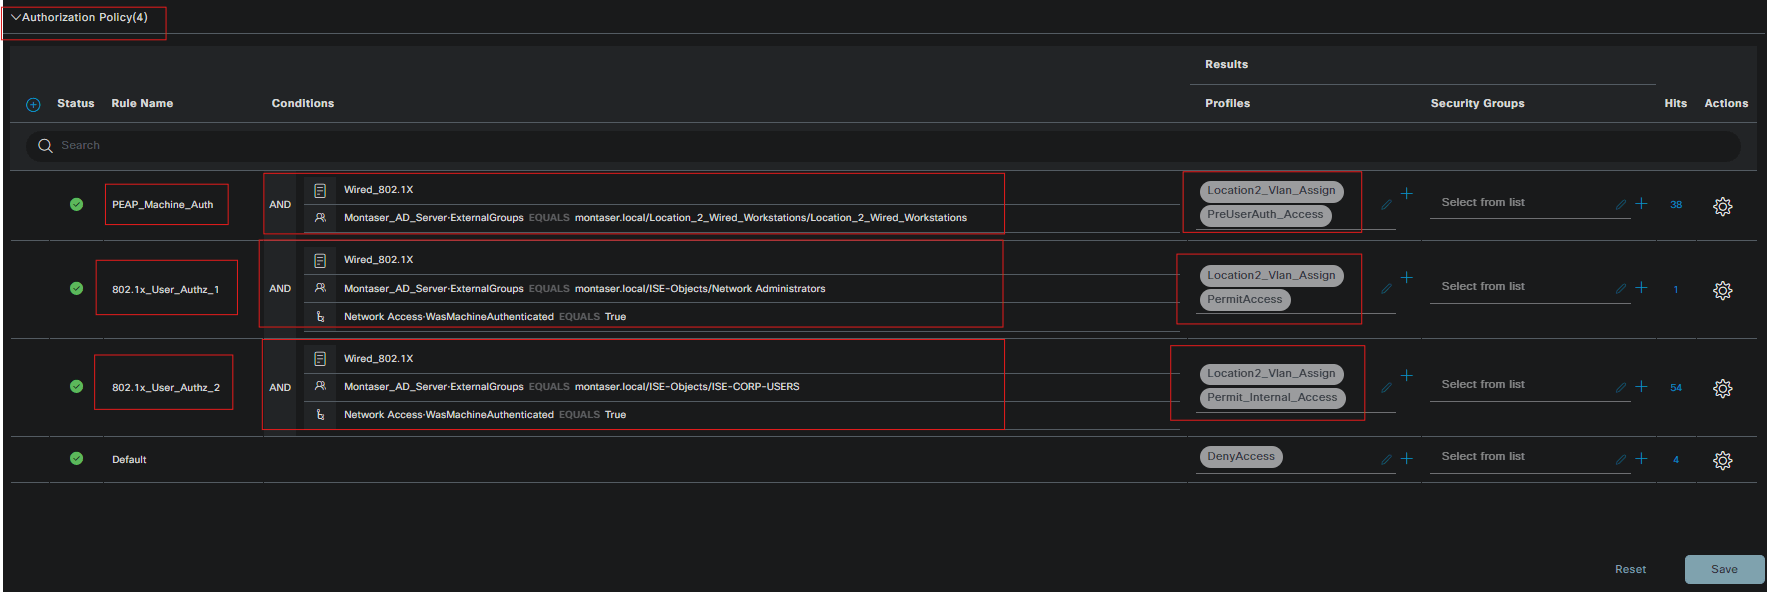
PEAP_Machine_Auth:
Conditions: Wired_802.1X AND Montaser_AD_Server:ExternalGroups EQUALS montaser.local/.../Location_2_Wired_Workstations
Results: Location2_Vlan_Assign, PreUserAuth_Access
Explanation: Matches a domain-joined computer at boot-up or the Windows lock screen. It validates the machine account against Active Directory and populates Cisco ISE’s internal cache for that MAC address.
802.1x_User_Authz_1:
Conditions: Wired_802.1X AND ExternalGroups EQUALS .../Network Administrators AND WasMachineAuthenticated EQUALS True
Results: Location2_Vlan_Assign, PermitAccess
Explanation: Grants elevated network access to network administrators (Full Access), provided they log in from a corporate-managed machine that has successfully passed the machine phase.
802.1x_User_Authz_2:
Conditions: Wired_802.1X AND ExternalGroups EQUALS .../ISE-CORP-USERS AND WasMachineAuthenticated EQUALS True
Results: Location2_Vlan_Assign, Permit_Internal_Access
Explanation: Grants general internal network access to standard corporate users (172.16.2.0/24 subnet only). It requires the underlying endpoint to be corporate-owned and registered in the active session cache.
At this stage AAA configuration for Location2 wired Devices is completed, tests and verifications can be made to confirm the intended behaviour.
Testing AAA
To evaluate the configuration, you can now power on Location2-EP-1 and log in using corpuser, which belongs to the Corporate Users group, or netadmin, which belongs to the Network Administrators group. After logging in, test connectivity to different networks and verify that each user receives the expected access based on their group membership. While testing, keep an eye on the RADIUS Live Logs in ISE. This should be the first place you check whenever you test a new policy or troubleshoot an authentication or authorization issue.
When Windows boots and reaches the login screen, its native supplicant immediately triggers a machine authentication attempt.
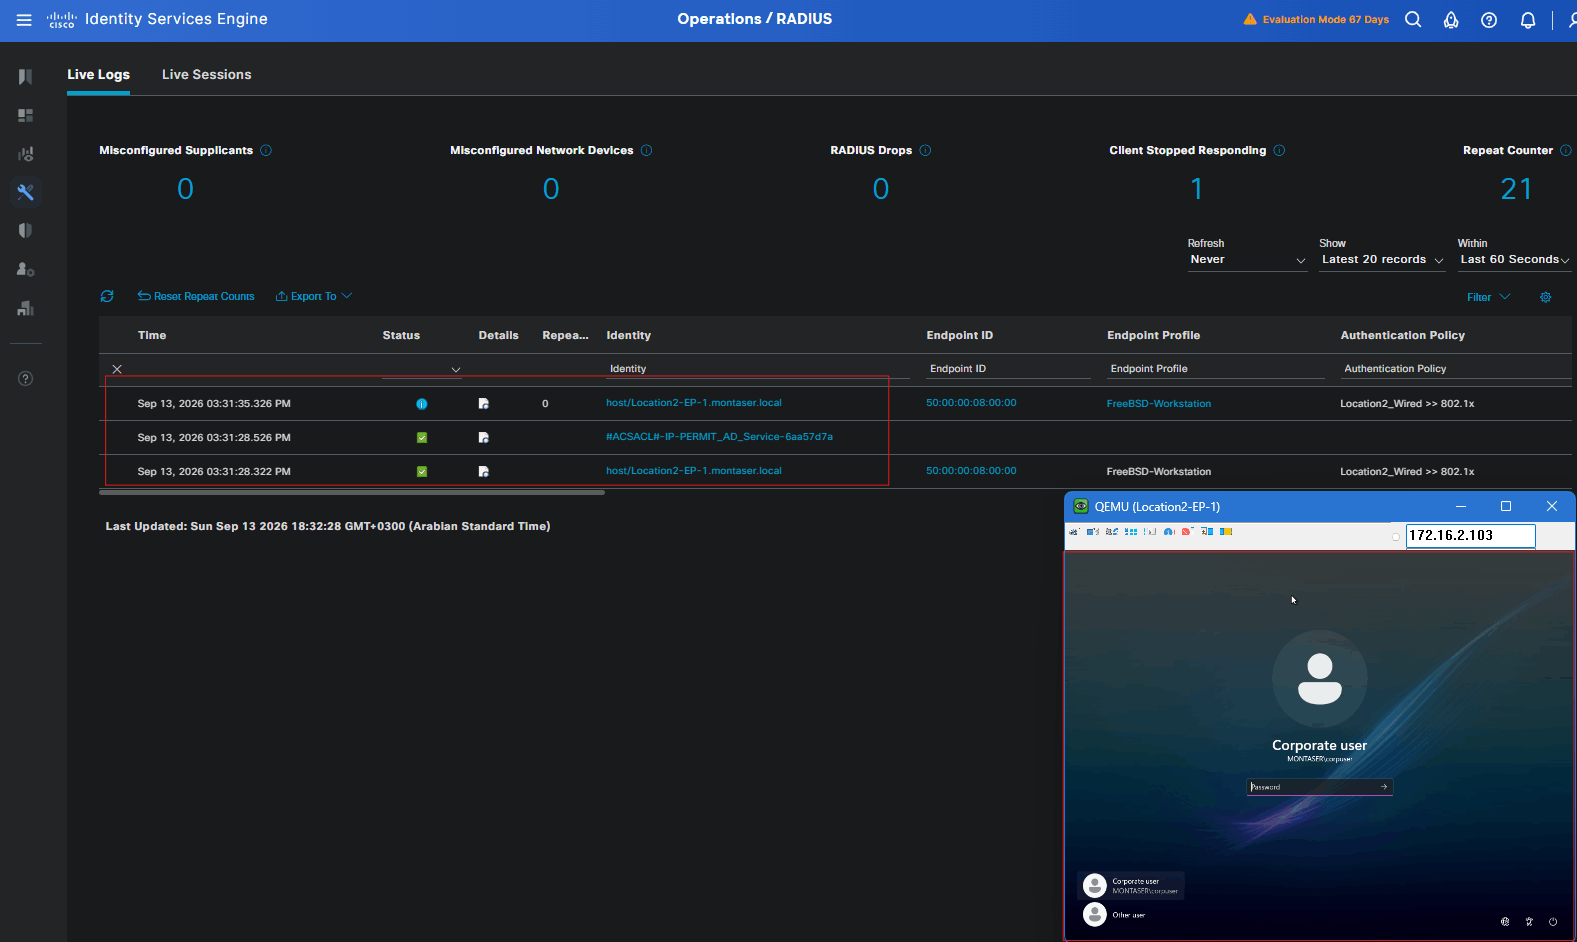
The machine authenticates successfully using its Active Directory computer account credentials. ISE returns the Permit_AD_Service dACL in the authorization result, and the NAD sends a session-start accounting request. Once the user provides their credentials, a second authentication attempt is triggered for the user.
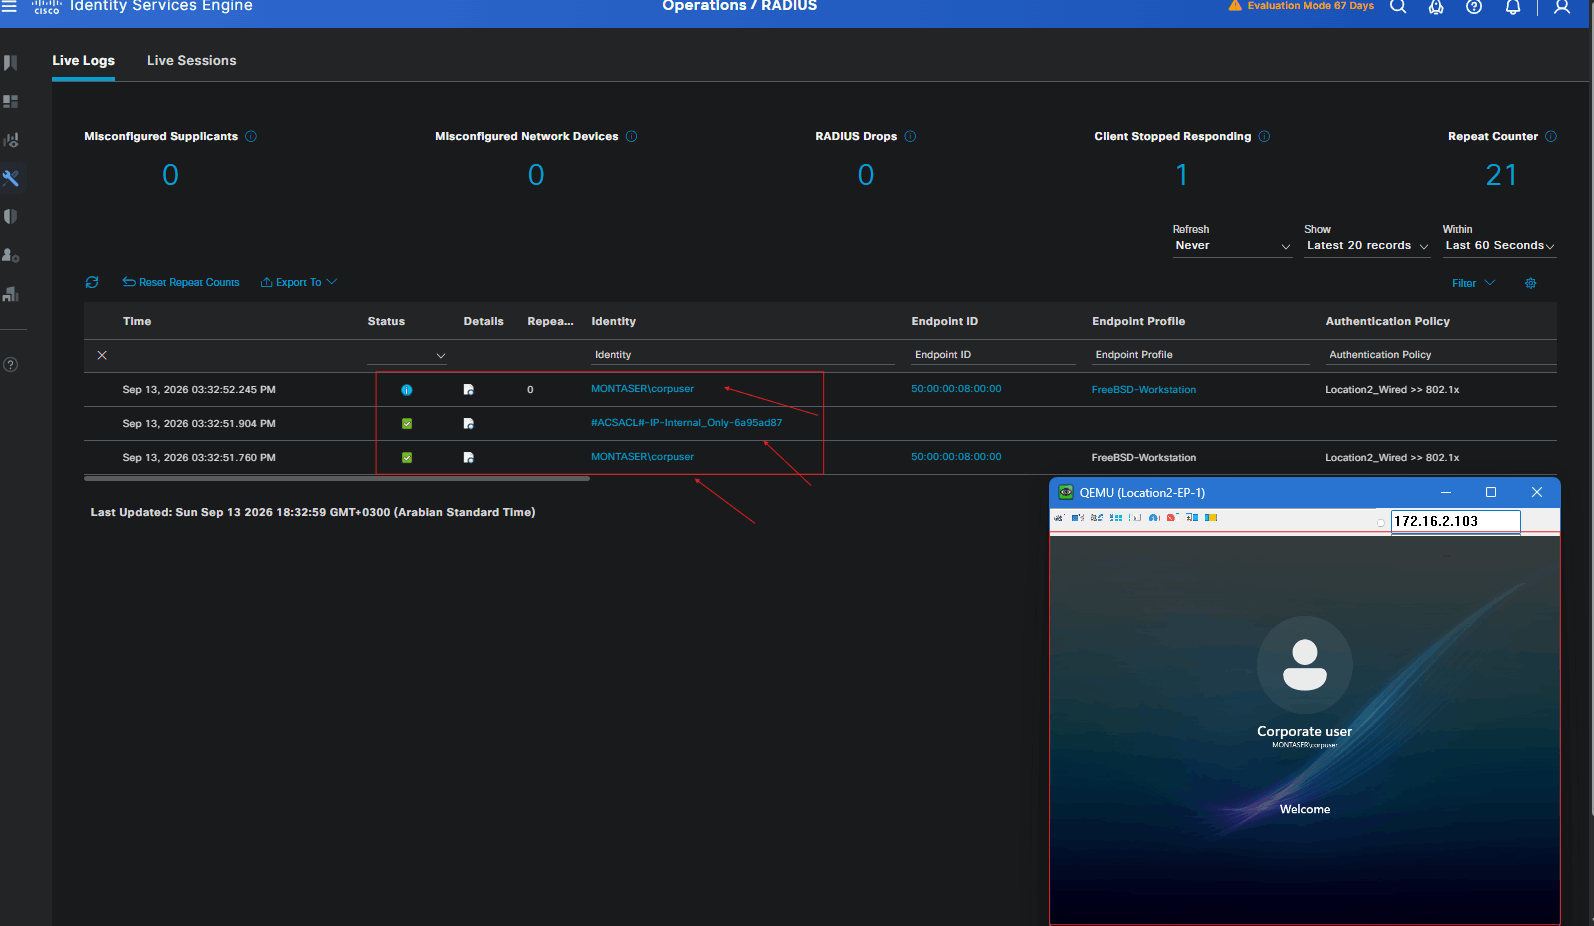
The user authenticates successfully using their AD credentials. This time, ISE returns the Internal_Only dACL in the authorization result, and the NAD sends a session-start accounting request for the user session.
Let’s take a look at the Authentication report provided by ISE.
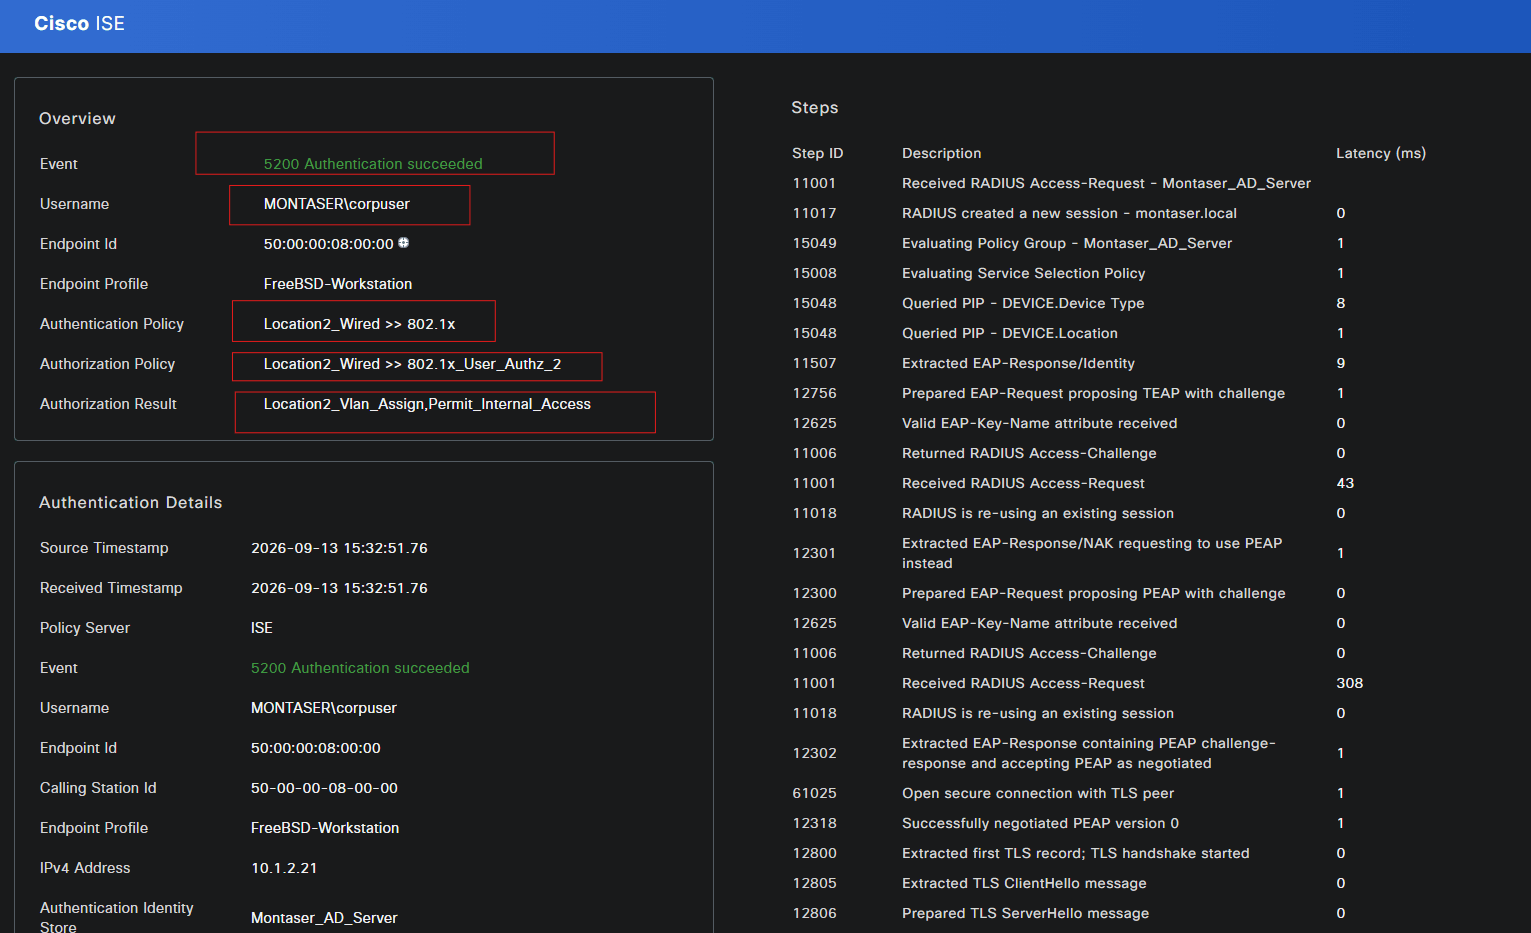
As you can see, the request matched the Location2_Wired Policy Set and the 802.1x_User_Authz_2 Authorization policy, which returned the Internal_Only dACL as the authorization result.
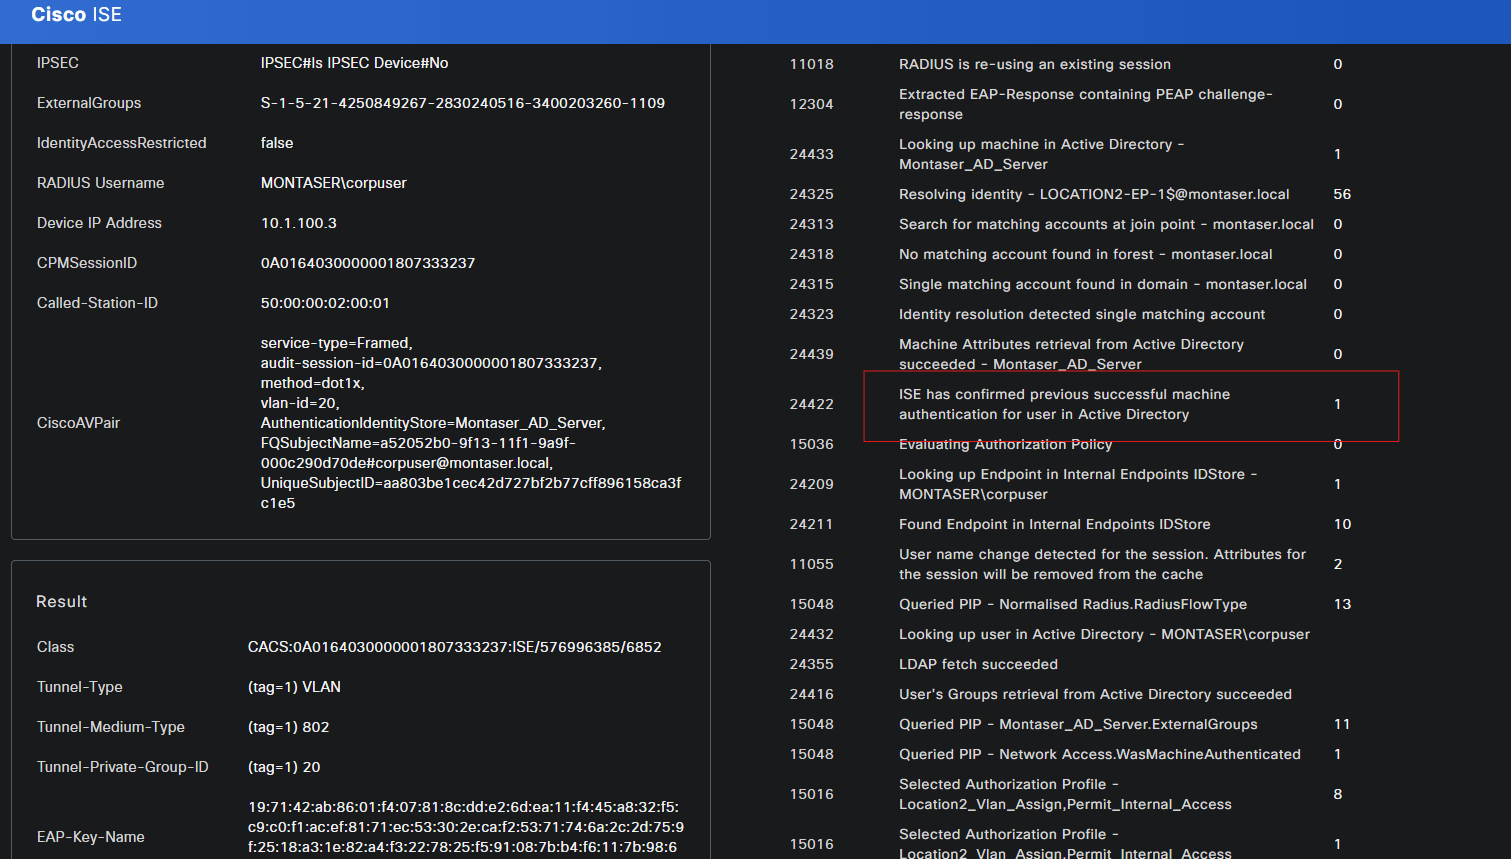
The line “24422 ISE has confirmed previous successful machine authentication for user in Active Directory”, is the result of enabling MAR.
Without MAR, this step will fail, along with the user authentication attempt, because ISE cannot verify that the user authentication is associated with a previously successful machine authentication.
- Cisco vSwitch applying
Internal_OnlydACL forcorpuser:
1
2
3
4
5
6
7
8
9
10
11
12
13
14
15
16
17
18
19
20
21
22
23
24
25
26
27
28
29
30
31
32
33
34
35
36
37

Location-2-ACC-Switch# show auth sessions interface g 0/1 de
            Interface:  GigabitEthernet0/1
          MAC Address:  5000.0008.0000
         IPv6 Address:  Unknown
         IPv4 Address:  10.1.2.21
            User-Name:  MONTASER\corpuser
               Status:  Authorized
               Domain:  DATA
       Oper host mode:  single-host
     Oper control dir:  both
      Session timeout:  3600s (local), Remaining: 3542s
       Timeout action:  Reauthenticate
      Restart timeout:  N/A
Periodic Acct timeout:  N/A
       Session Uptime:  3077s
    Common Session ID:  0A0164030000001807333237
      Acct Session ID:  0x0000002F
               Handle:  0x0D000009
       Current Policy:  POLICY_Gi0/1

Local Policies:
        Service Template: DEFAULT_LINKSEC_POLICY_SHOULD_SECURE (priority 150)
      Security Policy:  Should Secure
      Security Status:  Link Unsecure


Server Policies:
           Vlan Group:  Vlan: 20
              ACS ACL:  xACSACLx-IP-Internal_Only-6a95ad87

Method status list:
      Method            State

      dot1x              Authc Success
      mab                Stopped
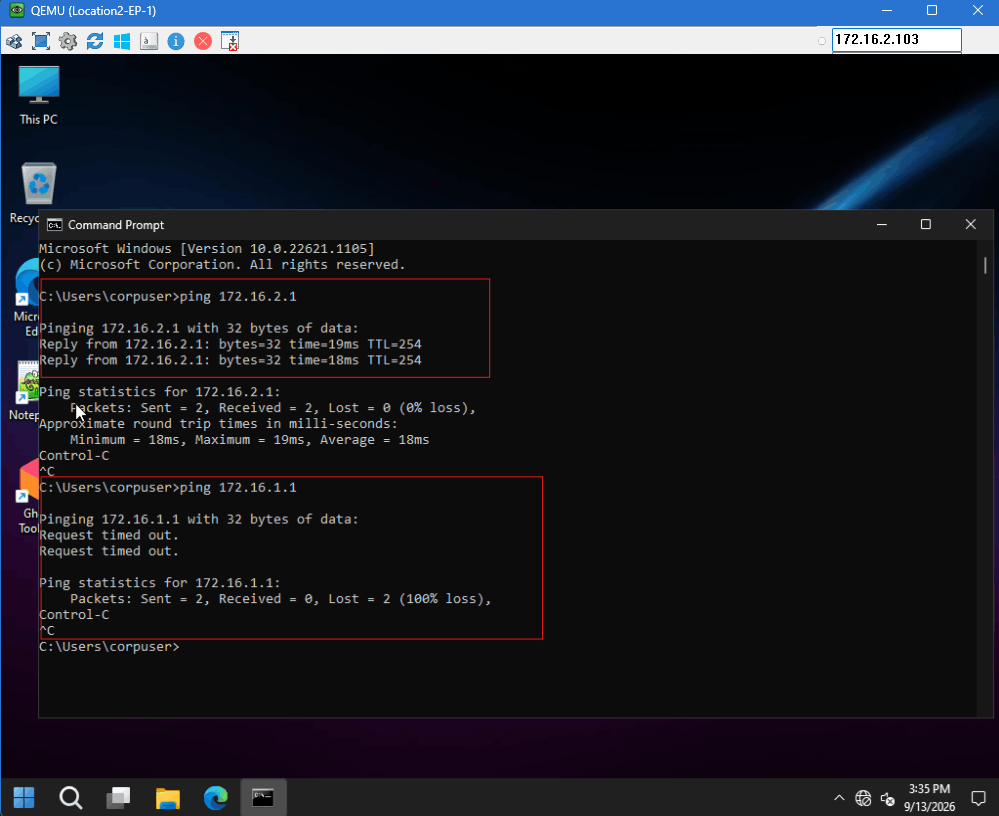
- Applying
Permit Access(Full Access) fornetadminuser: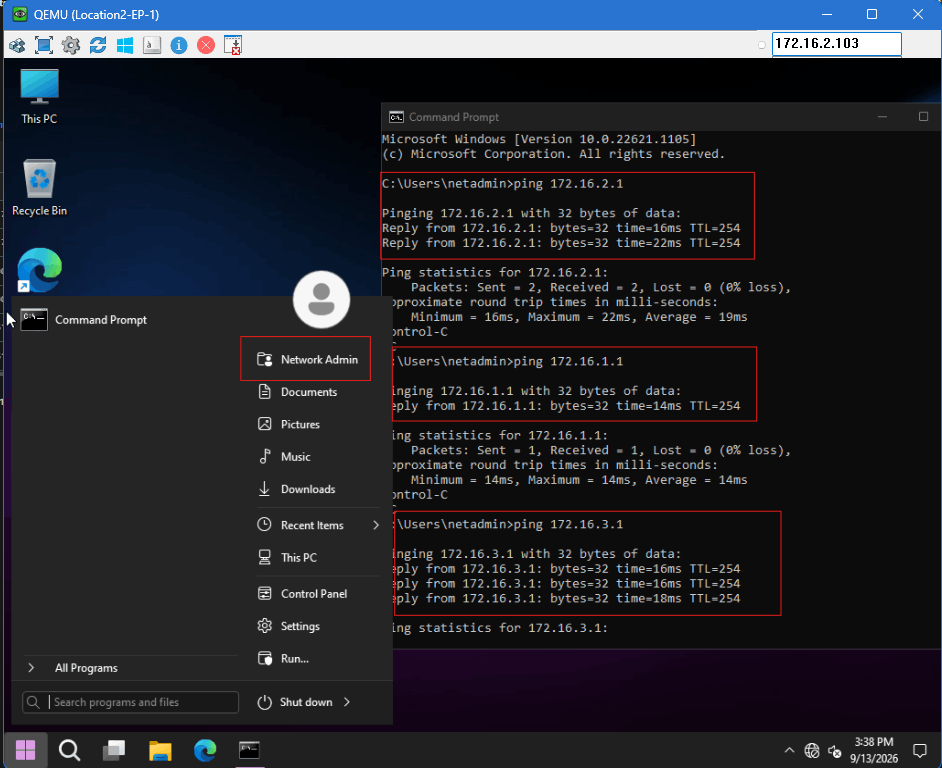
Conclusion
Implementing sequential machine-and-user authorization rules secures endpoints without the overhead of Machine Access Restrictions (MAR). By using Cisco ISE’s native Network Access:WasMachineAuthenticated attribute, organizations create a dual-factor requirement: users must provide valid credentials and operate from a managed, Active Directory-joined asset. This prevents rogue or unmanaged personal devices from accessing internal networks.
However, traditional credential-based methods (usernames and passwords) are inherently vulnerable to credential theft, phishing, and password spraying. For the highest level of network security, organizations should transition to EAP-TLS, which replaces weak passwords with cryptographic, certificate-based authentication for both the machine and the user.